RC Mini Car
Intro
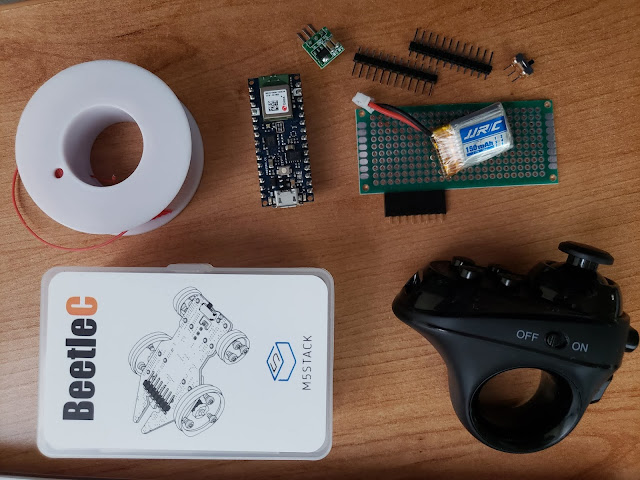
This blog entry doesn't have anything to do with optimization, but due to the interest shown for my Twitter posts about it, I'll make an exception. The M5Stack company has been prolific in creating modules and fun accessories around the ESP32 processor. Something that recently caught my eye is their Beetle-C mini car. It mates with their M5Stick-C mini computer to make a tiny "smart" remote controlled car. Their concept for the car is to control it over WiFi with an app running on an Android phone. I had a different plan. I imagined that I could just wire my own MCU to the 8-pin header on the car and do it My Waytm. I've also been experimenting with connecting BLE HID controls to the Nano 33 BLE, so I figured it would be a fun project to combine the two. Here is the parts list:M5Stack Beetle-C
Arduino Nano 33 BLE
ACGAM R1 "VR" BLE HID controller
DC-DC 5V boost converter
3x7cm tinned perfboard
8-pin female 0.1" header
Male 0.1" headers (I used 2 x 8-pin + 1-pin)
30AWG silicone coated wire
Battery (I used a 150mAh LiPo)
Power Switch
Info I Discovered
The schematic to the car has not been published, so I had to figure out a few things on my own. The Beetle-C has it's own CPU to control the 7 RGB LEDs and 2 motors. This CPU exposes an I2C slave interface on the 8 pin connector (address 0x38). The car needs 2 power rails to operate. The 3.3v line powers the CPU and the 5v line charges the internal 80mAh LiPo battery. This little battery, in turn, powers the motors and LEDs. There's no charge indicator on the Beetle-C, so I didn't discover the power rail relationship until draining the internal battery by using the car with only the 3.3v line active. For this reason, I chose to use a 5v DC-DC boost converter to provide 5v from my LiPo battery. This also makes it easier to power the Nano since the docs say that its VIN line needs at least 5V and connecting the 3.6-4.2v LiPo directly to the Vcc of the Nano might fry it. As far as power efficiency goes, this isn't ideal, but I didn't want to make major modifications to the Beetle-C nor the Nano to power them from the LiPo battery. The 3.3v Vcc of the Nano's internal voltage regulator then powers the 3.3v line of the Beetle-C.The Build
Part of my goal with choosing the Nano 33 BLE was to be able to make a control board that ended up not too much larger than the M5Stick-C. I don't have a 3D printer nor am I great at working with little mechanical parts, so the Beetle-C looked like a good motorized platform to build a simple circuit board onto. I arranged the parts in a way that fit pretty well in the original space, except for my LiPo battery.
The Beetle-C's 8-pin header
(The circuit diagram)
My finished board
(top)
I chose to use female headers on the Nano and male on this board; you can do the opposite. The 5V boost converter is small enough to fit neatly between the pins of the Nano.
(bottom)
The little knot is to provide strain relief for the LiPo power leads on the other side. I slightly bent the pins on the 8-pin female header before soldering it to make it lie flat against the PCB.Note: If you're going to build this project the way I did, please triple check all connections before powering it up. One unseen short can instantly fry your Arduino or other components.
(The finished board mounted on the Beetle-C)
The Controller
I chose the ACGAM R1 because it's available from many sellers, reasonably priced, works pretty well and was easy to talk to from the Nano 33 BLE. For this project, it's got a few issues to overcome before it can be used to drive the car:- When powered up, it starts in "media controller" mode. In this mode, the joystick and buttons don't behave the way we want. Press and hold the mode button (on the opposite side from the power button), then press the B button to switch to gamepad mode.
- The joystick appears to be a self-centering analog stick, but the device only outputs digital direction info (center/full up/full down, etc).
Controlling the car speed with this kind of control is a little harder. The way I decided to manage it is to make the up/down directions increase or decrease the speed while being held and the speed remains constant when the joystick is released (pops back to center position).
The Software
I started with my Nano_33_Gamepad sketch and added the necessary logic to control the car. You can find the Arduino sketch here. The code contains enough comments to understand what's going on.Here's a short video of the car in action. It's still a little fiddly to control, but the software is open source so you're welcome to do a pull request with any improvements :).


Do you have a link to the boost converter? I'm looking to buy a boost converter for the nano 33 ble.
ReplyDeleteI don't have a specific link. Search eBay or AliExpress (whichever you prefer) for "1V DC-DC boost" and you'll find several types.
Deletewhat boost converter are you using?
ReplyDeleteIt's a $0.70 one I bought from AliExpress. They can be found in many forms. Just search for "1V DC-DC boost"
DeleteThis comment has been removed by a blog administrator.
ReplyDelete